文章作者:jqpeng
原文链接: 知识图谱学习笔记(1)
知识图谱学习笔记第一部分,包含RDF介绍,以及Jena RDF API使用
知识图谱的基石:RDF
RDF(Resource Description Framework),即资源描述框架,其本质是一个数据模型(Data Model)。它提供了一个统一的标准,用于描述实体/资源。简单来说,就是表示事物的一种方法和手段。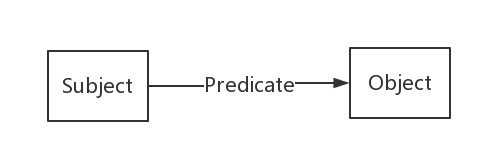
RDF序列化方法
RDF序列化的方式主要有:RDF/XML,N-Triples,Turtle,RDFa,JSON-LD等几种。
- RDF/XML,顾名思义,就是用XML的格式来表示RDF数据
- N-Triples,即用多个三元组来表示RDF数据集,是最直观的表示方法。在文件中,每一行表示一个三元组,方便机器解析和处理。开放领域知识图谱DBpedia通常是用这种格式来发布数据的。
- Turtle, [‘tɝtl] 应该是使用得最多的一种RDF序列化方式了。它比RDF/XML紧凑,且可读性比N-Triples好。
- RDFa,即“The Resource Description Framework in Attributes”,是HTML5的一个扩展,在不改变任何显示效果的情况下,让网站构建者能够在页面中标记实体,像人物、地点、时间、评论等等
- JSON-LD,即“JSON for Linking Data”,用键值对的方式来存储RDF数据
Example1 N-Triples:
<http://www.kg.com/person/1> <http://www.kg.com/ontology/chineseName> "罗纳尔多·路易斯·纳萨里奥·德·利马"^^string.
<http://www.kg.com/person/1> <http://www.kg.com/ontology/career> "足球运动员"^^string.
<http://www.kg.com/person/1> <http://www.kg.com/ontology/fullName> "Ronaldo Luís Nazário de Lima"^^string.
<http://www.kg.com/person/1> <http://www.kg.com/ontology/birthDate> "1976-09-18"^^date.
<http://www.kg.com/person/1> <http://www.kg.com/ontology/height> "180"^^int.
<http://www.kg.com/person/1> <http://www.kg.com/ontology/weight> "98"^^int.
<http://www.kg.com/person/1> <http://www.kg.com/ontology/nationality> "巴西"^^string.
<http://www.kg.com/person/1> <http://www.kg.com/ontology/hasBirthPlace> <http://www.kg.com/place/10086>.
<http://www.kg.com/place/10086> <http://www.kg.com/ontology/address> "里约热内卢"^^string.
<http://www.kg.com/place/10086> <http://www.kg.com/ontology/coordinate> "-22.908333, -43.196389"^^string.
Example2 Turtle:
@prefix person: <http://www.kg.com/person/> .
@prefix place: <http://www.kg.com/place/> .
@prefix : <http://www.kg.com/ontology/> .

person:1 :chineseName "罗纳尔多·路易斯·纳萨里奥·德·利马"^^string.
person:1 :career "足球运动员"^^string.
person:1 :fullName "Ronaldo Luís Nazário de Lima"^^string.
person:1 :birthDate "1976-09-18"^^date.
person:1 :height "180"^^int.
person:1 :weight "98"^^int.
person:1 :nationality "巴西"^^string.
person:1 :hasBirthPlace place:10086.
place:10086 :address "里约热内卢"^^string.
place:10086 :coordinate "-22.908333, -43.196389"^^string.
RDF的表达能力
RDF的表达能力有限,无法区分类和对象,也无法定义和描述类的关系/属性。RDF是对具体事物的描述,缺乏抽象能力,无法对同一个类别的事物进行定义和描述。就以罗纳尔多这个知识图为例,RDF能够表达罗纳尔多和里约热内卢这两个实体具有哪些属性,以及它们之间的关系。但如果我们想定义罗纳尔多是人,里约热内卢是地点,并且人具有哪些属性,地点具有哪些属性,人和地点之间存在哪些关系,这个时候RDF就表示无能为力了。
RDFS/OWL
RDFS/OWL本质上是一些预定义词汇(vocabulary)构成的集合,用于对RDF进行类似的类定义及其属性的定义。
RDFS/OWL序列化方式和RDF没什么不同,其实在表现形式上,它们就是RDF。其常用的方式主要是RDF/XML,Turtle。另外,通常我们用小写开头的单词或词组来表示属性,大写开头的表示类。数据属性(data property,实体和literal字面量的关系)通常由名词组成,而对象数据(object property,实体和实体之间的关系)通常由动词(has,is之类的)加名词组成。剩下的部分符合驼峰命名法。
轻量级的模式语言——RDFS
RDFS,即“Resource Description Framework Schema”,是最基础的模式语言。还是以罗纳尔多知识图为例,我们在概念、抽象层面对RDF数据进行定义。下面的RDFS定义了人和地点这两个类,及每个类包含的属性。
@prefix rdfs: <http://www.w3.org/2000/01/rdf-schema#> .
@prefix rdf: <http://www.w3.org/1999/02/22-rdf-syntax-ns#> .
@prefix : <http://www.kg.com/ontology/> .

### 这里我们用词汇rdfs:Class定义了“人”和“地点”这两个类。
:Person rdf:type rdfs:Class.
:Place rdf:type rdfs:Class.

### rdfs当中不区分数据属性和对象属性,词汇rdf:Property定义了属性,即RDF的“边”。

:chineseName rdf:type rdf:Property;    rdfs:domain :Person;    rdfs:range xsd:string .

:career rdf:type rdf:Property;    rdfs:domain :Person;    rdfs:range xsd:string .

:fullName rdf:type rdf:Property;    rdfs:domain :Person;    rdfs:range xsd:string .

:birthDate rdf:type rdf:Property;    rdfs:domain :Person;    rdfs:range xsd:date .

:height rdf:type rdf:Property;    rdfs:domain :Person;    rdfs:range xsd:int .

:weight rdf:type rdf:Property;    rdfs:domain :Person;    rdfs:range xsd:int .

:nationality rdf:type rdf:Property;    rdfs:domain :Person;    rdfs:range xsd:string .

:hasBirthPlace rdf:type rdf:Property;    rdfs:domain :Person;    rdfs:range :Place .

:address rdf:type rdf:Property;    rdfs:domain :Place;    rdfs:range xsd:string .

:coordinate rdf:type rdf:Property;    rdfs:domain :Place;    rdfs:range xsd:string .
RDFS几个比较重要,常用的词汇:
- rdfs:Class. 用于定义类
- rdfs:domain. 用于表示该属性属于哪个类别
- rdfs:range. 用于描述该属性的取值类型
- rdfs:subClassOf. 用于描述该类的父类
- rdfs:subProperty. 用于描述该属性的父属性
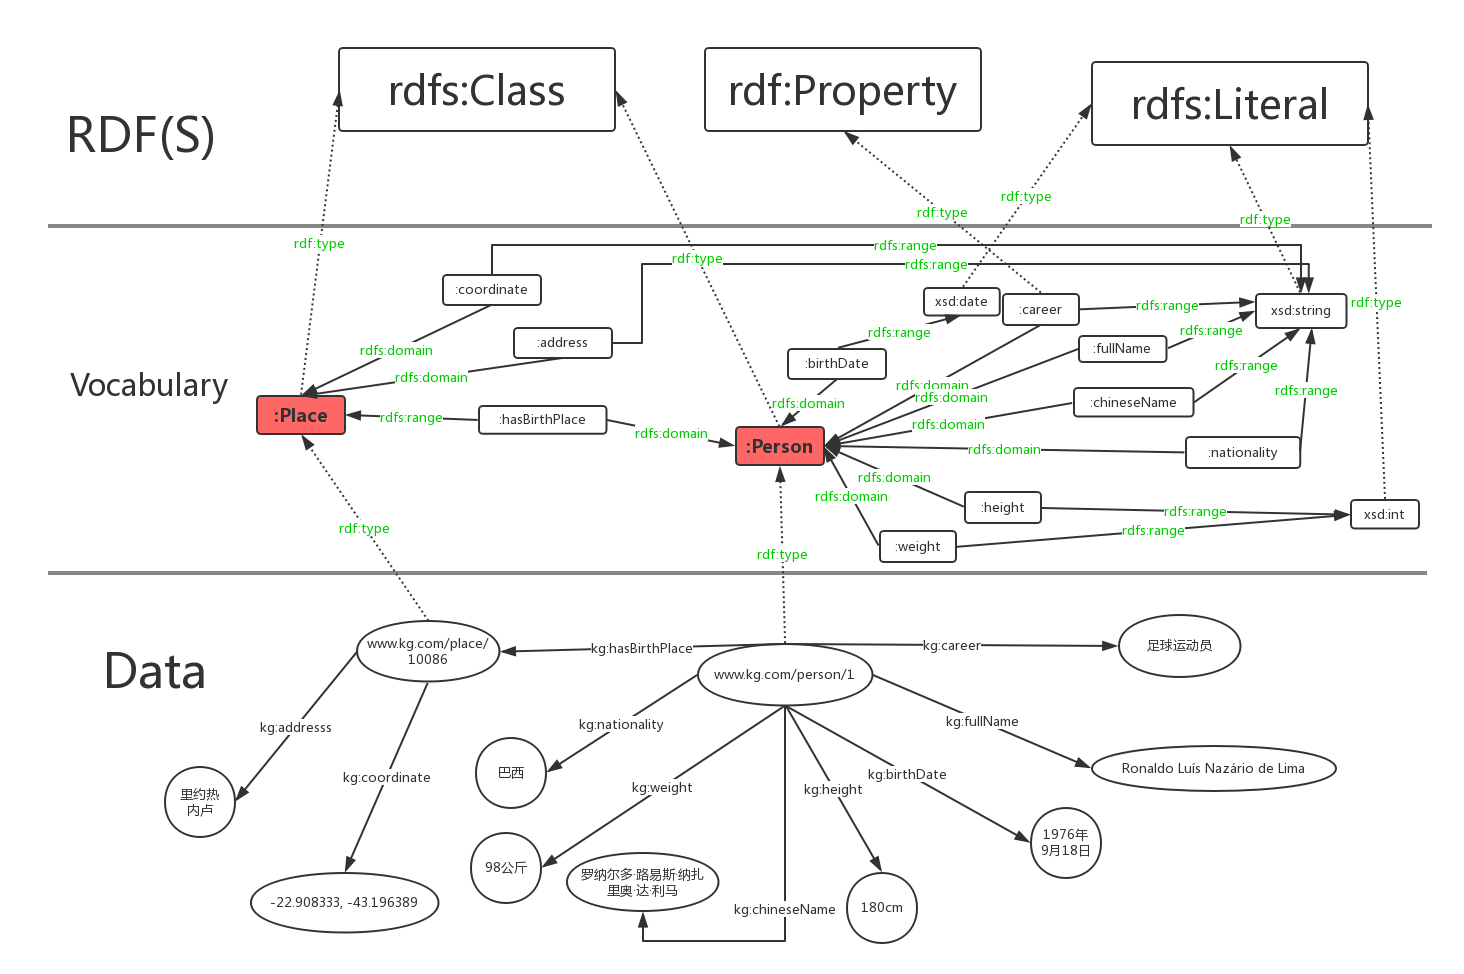
Data层是我们用RDF对罗纳尔多知识图的具体描述,Vocabulary是我们自己定义的一些词汇(类别,属性),RDF(S)则是预定义词汇。从下到上是一个具体到抽象的过程。图中我们用红色圆角矩形表示类,绿色字体表示rdf:type,rdfs:domain,rdfs:range三种预定义词汇,虚线表示rdf:type这种所属关系。
RDFS的扩展——OWL
RDFS本质上是RDF词汇的一个扩展。后来人们发现RDFS的表达能力还是相当有限,因此提出了OWL。我们也可以把OWL当做是RDFS的一个扩展,其添加了额外的预定义词汇。
OWL,即“Web Ontology Language”,语义网技术栈的核心之一。OWL有两个主要的功能:
- 提供快速、灵活的数据建模能力。
- 高效的自动推理。
用OWL对罗纳尔多知识图进行语义层的描述:
@prefix rdfs: <http://www.w3.org/2000/01/rdf-schema#> .
@prefix rdf: <http://www.w3.org/1999/02/22-rdf-syntax-ns#> .
@prefix : <http://www.kg.com/ontology/> .
@prefix owl: <http://www.w3.org/2002/07/owl#> .

### 这里我们用词汇owl:Class定义了“人”和“地点”这两个类。
:Person rdf:type owl:Class.
:Place rdf:type owl:Class.

### owl区分数据属性和对象属性(对象属性表示实体和实体之间的关系)。词汇owl:DatatypeProperty定义了数据属性,owl:ObjectProperty定义了对象属性。
:chineseName rdf:type owl:DatatypeProperty;    rdfs:domain :Person;    rdfs:range xsd:string .

:career rdf:type owl:DatatypeProperty;    rdfs:domain :Person;    rdfs:range xsd:string .

:fullName rdf:type owl:DatatypeProperty;    rdfs:domain :Person;    rdfs:range xsd:string .

:birthDate rdf:type owl:DatatypeProperty;    rdfs:domain :Person;    rdfs:range xsd:date .

:height rdf:type owl:DatatypeProperty;    rdfs:domain :Person;    rdfs:range xsd:int .

:weight rdf:type owl:DatatypeProperty;    rdfs:domain :Person;    rdfs:range xsd:int .

:nationality rdf:type owl:DatatypeProperty;    rdfs:domain :Person;    rdfs:range xsd:string .

:hasBirthPlace rdf:type owl:ObjectProperty;    rdfs:domain :Person;    rdfs:range :Place .

:address rdf:type owl:DatatypeProperty;    rdfs:domain :Place;    rdfs:range xsd:string .

:coordinate rdf:type owl:DatatypeProperty;    rdfs:domain :Place;    rdfs:range xsd:string .
schema层的描述语言换为OWL后,层次图表示为: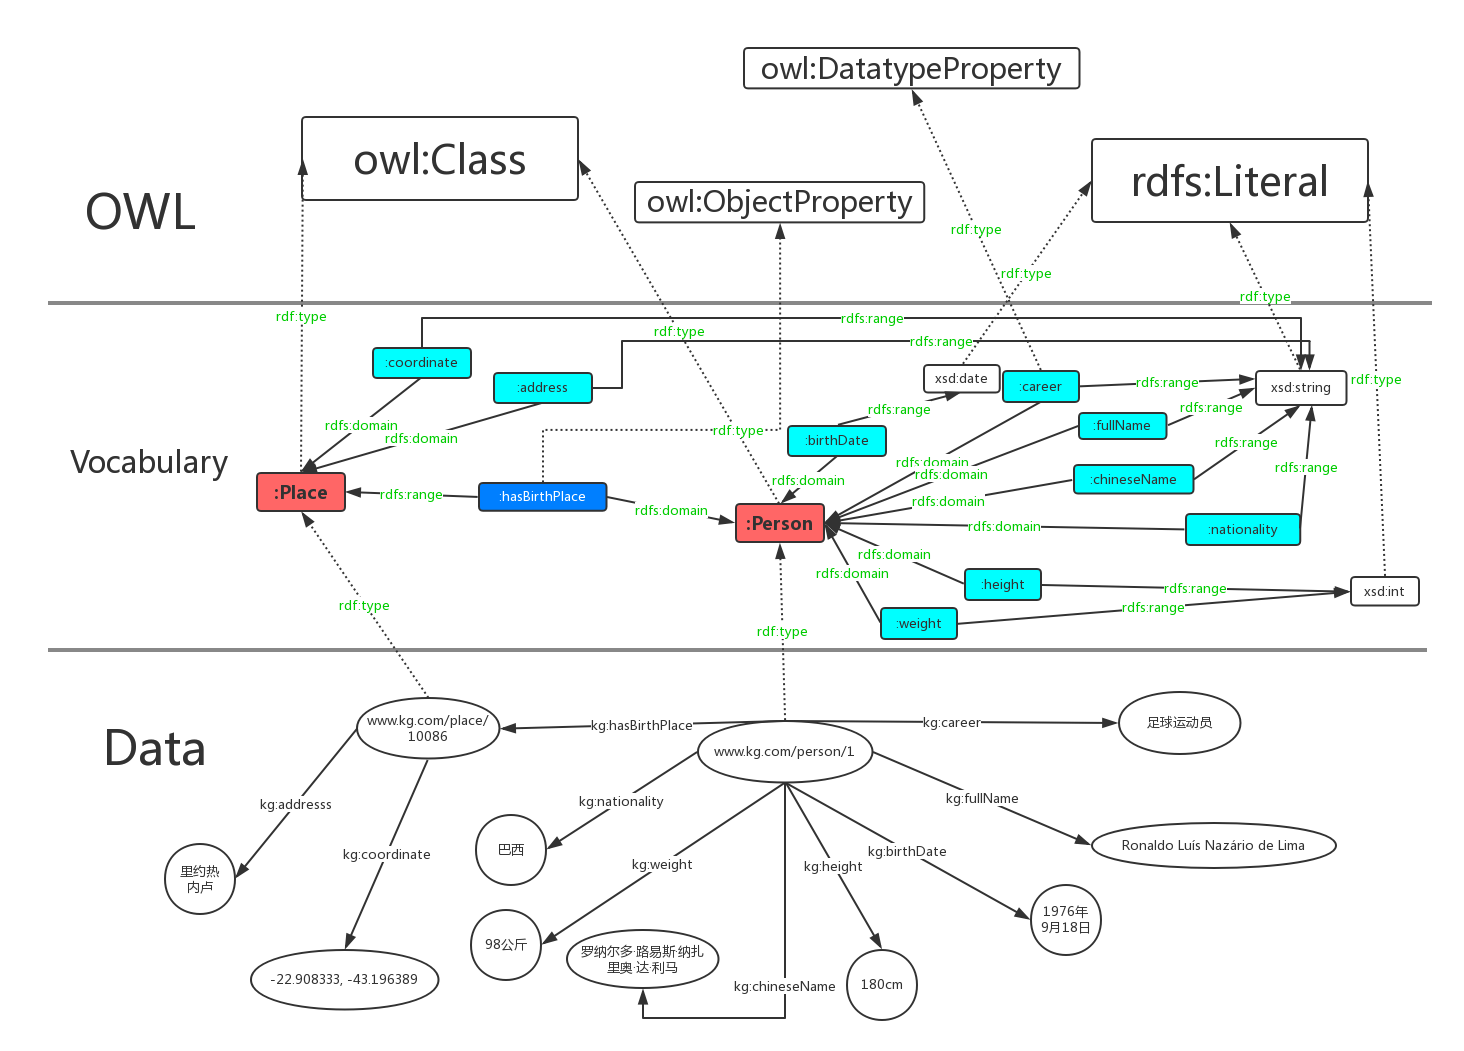
owl区分数据属性和对象属性(对象属性表示实体和实体之间的关系)。词汇owl:DatatypeProperty定义了数据属性,owl:ObjectProperty定义了对象属性。
上图中,数据属性用青色表示,对象属性由蓝色表示。
描述属性特征的词汇
- owl:TransitiveProperty. 表示该属性具有传递性质。例如,我们定义“位于”是具有传递性的属性,若A位于B,B位于C,那么A肯定位于C。
- owl:SymmetricProperty. 表示该属性具有对称性。例如,我们定义“认识”是具有对称性的属性,若A认识B,那么B肯定认识A。
- owl:FunctionalProperty. 表示该属性取值的唯一性。 例如,我们定义“母亲”是具有唯一性的属性,若A的母亲是B,在其他地方我们得知A的母亲是C,那么B和C指的是同一个人。
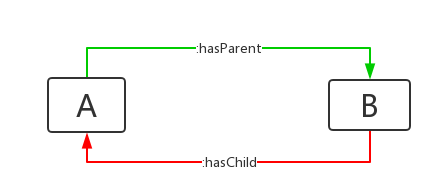
- owl:inverseOf. 定义某个属性的相反关系。例如,定义“父母”的相反关系是“子女”,若A是B的父母,那么B肯定是A的子女。
本体映射词汇(Ontology Mapping)
- owl:equivalentClass. 表示某个类和另一个类是相同的。
- owl:equivalentProperty. 表示某个属性和另一个属性是相同的。
- owl:sameAs. 表示两个实体是同一个实体。
RDFS,OWL推理的推理机(reasoner)
RDFS同样支持推理,由于缺乏丰富的表达能力,推理能力也不强。举个例子,我们用RDFS定义人和动物两个类,另外,定义人是动物的一个子类。此时推理机能够推断出一个实体若是人,那么它也是动物。OWL当然支持这种基本的推理,除此之外,凭借其强大的表达能力,我们能进行更有实际意义的推理。想象一个场景,我们有一个庞大数据库存储人物的亲属关系。里面很多关系都是单向的,比如,其只保存了A的父亲(母亲)是B,但B的子女字段里面没有A,可以推理得到B的子女A。
。
RDF查询语言SPARQL
SPARQL即SPARQL Protocol and RDF Query Language的递归缩写,专门用于访问和操作RDF数据,是语义网的核心技术之一。W3C的RDF数据存取小组(RDF Data Access Working Group, RDAWG)对其进行了标准化。在2008年,SPARQL 1.0成为W3C官方所推荐的标准。2013年发布了SPARQL 1.1。相对第一个版本,其支持RDF图的更新,提供更强大的查询,比如:子查询、聚合操作(像我们常用的count)等等。
由两个部分组成:协议和查询语言。
- 查询语言很好理解,就像SQL用于查询关系数据库中的数据,XQuery用于查询XML数据,SPARQL用于查询RDF数据。
- 协议是指我们可以通过HTTP协议在客户端和SPARQL服务器(SPARQL endpoint)之间传输查询和结果,这也是和其他查询语言最大的区别。
一个SPARQL查询本质上是一个带有变量的RDF图,以我们之前提到的罗纳尔多RDF数据为例:
<http://www.kg.com/person/1> <http://www.kg.com/ontology/chineseName> "罗纳尔多·路易斯·纳萨里奥·德·利马"^^string.
查询SPARQL
<http://www.kg.com/person/1> <http://www.kg.com/ontology/chineseName> ?x.
SPARQL查询是基于图匹配的思想。我们把上述的查询与RDF图进行匹配,找到符合该匹配模式的所有子图,最后得到变量的值。就上面这个例子而言,在RDF图中找到匹配的子图后,将”罗纳尔多·路易斯·纳萨里奥·德·利马”和“?x”绑定,我们就得到最后的结果。简而言之,SPARQL查询分为三个步骤:
- 构建查询图模式,表现形式就是带有变量的RDF。
- 匹配,匹配到符合指定图模式的子图。
- 绑定,将结果绑定到查询图模式对应的变量上。
举例
如何查询所有数据
PREFIX : <http://www.kgdemo.com#>
PREFIX rdf: <http://www.w3.org/1999/02/22-rdf-syntax-ns#>
PREFIX owl: <http://www.w3.org/2002/07/owl#>
PREFIX xsd: <XML Schema>
PREFIX vocab: <http://localhost:2020/resource/vocab/>
PREFIX rdfs: <http://www.w3.org/2000/01/rdf-schema#>
PREFIX map: <http://localhost:2020/resource/#>
PREFIX db: <http://localhost:2020/resource/>

SELECT * WHERE {
  ?s ?p ?o
}
SPARQL的部分关键词:
- SELECT, 指定我们要查询的变量。在这里我们查询所有的变量,用*代替。
- WHERE,指定我们要查询的图模式。含义上和SQL的WHERE没有区别。
- FROM,指定查询的RDF数据集。我们这里只有一个图,因此省去了FROM关键词。 PREFIX,用于IRI的缩写。
“周星驰出演了哪些电影”:
PREFIX : <http://www.kgdemo.com#>
PREFIX rdf: <http://www.w3.org/1999/02/22-rdf-syntax-ns#>
PREFIX owl: <http://www.w3.org/2002/07/owl#>
PREFIX xsd: <XML Schema>
PREFIX vocab: <http://localhost:2020/resource/vocab/>
PREFIX rdfs: <http://www.w3.org/2000/01/rdf-schema#>
PREFIX map: <http://localhost:2020/resource/#>
PREFIX db: <http://localhost:2020/resource/>

SELECT ?n WHERE {
  ?s rdf:type :Person.
  ?s :personName '周星驰'.
  ?s :hasActedIn ?o.
  ?o :movieTitle ?n
}
使用Jena 构建知识图谱
Jena是Apache基金会旗下的开源Java框架,用于构建Semantic Web 和 Linked Data 应用。
下面简要的介绍下API,要使用jena,可以下载jar包或者使用maven(推荐),建议测试时下面的都加上:
    <dependency>    <groupId>org.apache.jena</groupId>    <artifactId>apache-jena-libs</artifactId>    <type>pom</type>    <version>3.7.0</version></dependency><dependency>    <groupId>org.apache.jena</groupId>    <artifactId>jena-sdb</artifactId>    <version>3.7.0</version></dependency><dependency>    <groupId>org.apache.jena</groupId>    <artifactId>jena-base</artifactId>    <version>3.7.0</version></dependency><dependency>    <groupId>org.apache.jena</groupId>    <artifactId>jena-fuseki-embedded</artifactId>    <version>3.7.0</version> <!-- Set the version --></dependency>
<!-- https://mvnrepository.com/artifact/org.apache.jena/jena-arq --><dependency>    <groupId>org.apache.jena</groupId>    <artifactId>jena-arq</artifactId>    <version>3.7.0</version></dependency>
Jena RDF API
首先,三元组(triple)组成的图称之为Model,这个图里的Node可以是resources(实体)、literals(文本)或者blank nodes。
一个三元组,在jena里称之为Statement,一个 statement 包含三部分::
- the subject :实体
- the predicate :属性
- the object : 值
创建Model
// URI 定义
static String personURI    = "http://somewhere/JohnSmith";
static String fullName     = "John Smith";

// 创建一个空模型(KG)
Model model = ModelFactory.createDefaultModel();

// 创建一个resource(一个subject)
Resource johnSmith = model.createResource(personURI);

// 添加属性,这里的value是一个literals(文本)
 johnSmith.addProperty(VCARD.FN, fullName);
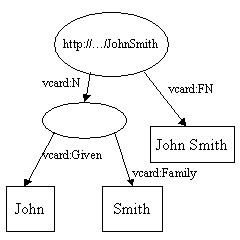
当然,你还可以使用链式API,为resource添加多个Property
// create the resource
//   and add the properties cascading style
Resource johnSmith
  = model.createResource(personURI)     .addProperty(VCARD.FN, fullName)     .addProperty(VCARD.N,                  model.createResource()                       .addProperty(VCARD.Given, givenName)                       .addProperty(VCARD.Family, familyName));
遍历Model
使用model.listStatements遍历statements,返回一个迭代器,使用hasNext判断是否还有数据,通过getSubject,getPredicate,getObject 获取三元组信息。
// list the statements in the Model
StmtIterator iter = model.listStatements();

// print out the predicate, subject and object of each statement
while (iter.hasNext()) {
    Statement stmt      = iter.nextStatement();  // get next statement
    Resource  subject   = stmt.getSubject();     // get the subject
    Property  predicate = stmt.getPredicate();   // get the predicate
    RDFNode   object    = stmt.getObject();      // get the object
    System.out.print(subject.toString());
    System.out.print(" " + predicate.toString() + " ");
    if (object instanceof Resource) {
       System.out.print(object.toString());
    } else {
        // object is a literal
        System.out.print(" \"" + object.toString() + "\"");
    }
    System.out.println(" .");
}
运行结果:
http://somewhere/JohnSmith http://www.w3.org/2001/vcard-rdf/3.0#N 80aeb72e-ef9c-4879-807d-62daf3c13b72 .
http://somewhere/JohnSmith http://www.w3.org/2001/vcard-rdf/3.0#FN  "John Smith" .
80aeb72e-ef9c-4879-807d-62daf3c13b72 http://www.w3.org/2001/vcard-rdf/3.0#Family  "Smith" .
80aeb72e-ef9c-4879-807d-62daf3c13b72 http://www.w3.org/2001/vcard-rdf/3.0#Given  "John" .
保存为 RDF文件
可以使用model.write方便的把Model保存为rdf文件,write默认保存为XML格式
// now write the model in XML form to a file
model.write(System.out);


<rdf:RDF
  xmlns:rdf='http://www.w3.org/1999/02/22-rdf-syntax-ns#'
  xmlns:vcard='http://www.w3.org/2001/vcard-rdf/3.0#'
 >
  <rdf:Description rdf:about='http://somewhere/JohnSmith'>
    <vcard:FN>John Smith</vcard:FN>
    <vcard:N rdf:nodeID="A0"/>
  </rdf:Description>
  <rdf:Description rdf:nodeID="A0">
    <vcard:Given>John</vcard:Given>
    <vcard:Family>Smith</vcard:Family>
  </rdf:Description>
</rdf:RDF>
write还提供重载版本write( OutputStream out, String lang ),lang可以为”RDF/XML-ABBREV”, “N-TRIPLE”, “TURTLE”, (and “TTL”) and “N3”
我们来保存为常见的TURTLE:
model.write(System.out, "TURTLE");
结果:
<http://somewhere/JohnSmith> <http://www.w3.org/2001/vcard-rdf/3.0#FN> "John Smith" ; <http://www.w3.org/2001/vcard-rdf/3.0#N> [ <http://www.w3.org/2001/vcard-rdf/3.0#Family> "Smith" ; <http://www.w3.org/2001/vcard-rdf/3.0#Given> "John" ] .
jena还提供prefix功能,我们可以指定prefix来简化turtle,下面的代码将指定prefix,并保存到文件1.rdf里:
model.setNsPrefix( "vCard", "http://www.w3.org/2001/vcard-rdf/3.0#" ); model.setNsPrefix( "rdf", "http://www.w3.org/1999/02/22-rdf-syntax-ns#" ); try { model.write(new FileOutputStream("1.rdf"),"TURTLE"); } catch (FileNotFoundException e) { e.printStackTrace(); }
结果:
@prefix rdf:   <http://www.w3.org/1999/02/22-rdf-syntax-ns#> .
@prefix vCard: <http://www.w3.org/2001/vcard-rdf/3.0#> .

<http://somewhere/JohnSmith>    vCard:FN  "John Smith" ;    vCard:N   [ vCard:Family  "Smith" ;                vCard:Given   "John"              ] .
读取rdf
Mode的read(Reader reader, String base)方法,提供 读取RDF文件的功能:
    static final String inputFileName  = "1.rdf";

    public static void main (String args[]) {
        // create an empty model
        Model model = ModelFactory.createDefaultModel();

        InputStream in = FileManager.get().open( inputFileName );
        if (in == null) {
            throw new IllegalArgumentException( "File: " + inputFileName + " not found");
        }

        // read the RDF/XML file
        model.read(in, "","TURTLE");

        // write it to standard out
        model.write(System.out);
    }
注意,read的时候,默认是读取XML,如果是其他格式,需要指定lang。
从模型读取Resouce
一个resouce都有一个唯一的URI,我们可以通过URI来获取对应的Resouce:
函数原型:
/** Return a Resource instance with the given URI in this model. <i>This method behaves identically to <code>createResource(String)</code></i> and exists as legacy: createResource is now capable of, and allowed to, reuse existing objects.<p> Subsequent operations on the returned object may modify this model. @return a resource instance @param uri the URI of the resource*/Resource getResource(String uri) ;
获取到Resouce后,通过getRequiredProperty获取属性,如果一个属性包含多个值,可以使用listProperties获取。
 static final String inputFileName = "1.rdf";
    static final String johnSmithURI = "http://somewhere/JohnSmith";

    public static void main (String args[]) {
        // create an empty model
        Model model = ModelFactory.createDefaultModel();

        // use the FileManager to find the input file
        InputStream in = FileManager.get().open(inputFileName);
        if (in == null) {
            throw new IllegalArgumentException( "File: " + inputFileName + " not found");
        }

        // read the RDF/XML file
        model.read(new InputStreamReader(in), "");

        // retrieve the Adam Smith vcard resource from the model
        Resource vcard = model.getResource(johnSmithURI);

        // retrieve the value of the N property
        Resource name = (Resource) vcard.getRequiredProperty(VCARD.N)
                                        .getObject();
        // retrieve the given name property
        String fullName = vcard.getRequiredProperty(VCARD.FN)
                               .getString();
        // add two nick name properties to vcard
        vcard.addProperty(VCARD.NICKNAME, "Smithy")
             .addProperty(VCARD.NICKNAME, "Adman");

        // set up the output
        System.out.println("The nicknames of \"" + fullName + "\" are:");
        // list the nicknames
        StmtIterator iter = vcard.listProperties(VCARD.NICKNAME);
        while (iter.hasNext()) {
            System.out.println("    " + iter.nextStatement().getObject()
                                            .toString());
        }

        try {
            model.write(new FileOutputStream("1.rdf"));
        } catch (FileNotFoundException e) {
            e.printStackTrace();
        }
    }
查询模型
可以通过listResourcesWithProperty查询包含Property的数据:
    ResIterator iter = model.listResourcesWithProperty(VCARD.FN);
        if (iter.hasNext()) {
            System.out.println("The database contains vcards for:");
            while (iter.hasNext()) {
                System.out.println("  " + iter.nextResource()
                                              .getRequiredProperty(VCARD.FN)
                                              .getString() );
            }
        } else {
            System.out.println("No vcards were found in the database");
        }
通过listStatements(SimpleSelector)查询Statement:
        // select all the resources with a VCARD.FN property
        // whose value ends with "Smith"
        StmtIterator iter = model.listStatements(
            new
                SimpleSelector(null, VCARD.FN, (RDFNode) null) {
                    @Override
                    public boolean selects(Statement s) {
                            return s.getString().endsWith("Smith");
                    }
                });
        if (iter.hasNext()) {
            System.out.println("The database contains vcards for:");
            while (iter.hasNext()) {
                System.out.println("  " + iter.nextStatement()
                                              .getString());
            }
        } else {
            System.out.println("No Smith's were found in the database");
        }
模型合并
可以通过union合并两个模型:
合并后:
来源
作者:Jadepeng
出处:jqpeng的技术记事本–http://www.cnblogs.com/xiaoqi
您的支持是对博主最大的鼓励,感谢您的认真阅读。
本文版权归作者所有,欢迎转载,但未经作者同意必须保留此段声明,且在文章页面明显位置给出原文连接,否则保留追究法律责任的权利。


